The Centroid is a 16-track studio mixer. Each of the 16 channels have the same functionality, each channel includes a semi-parametric equaliser, panning and gain controls. The centroid also includes 2 auxiliary send/return inputs, this makes it possible for 2 different effect chains to be inputed through the device. Each channel has a set of controls which can be used to determine how much the signal from each channel is affected by the inputed effects. The Centroid is a very tough machine that will still work even if you stand on it.

Channel Controls
This is where each inputed channel can be adjusted individually. All of the 16 channels include exactly the same parameters, for this reason the below image only labels the parameters of Channel 3.
NOTE: The below image only shows the controls found on channel 3 although all channel parameters work the same way for each channel.

#gain - Control over the channels input gain.
#high - Allows controls over the inputed signals high frequencies.
#freq - This control is specific to the mid control, this control allows definition of how much of the signal is affected by the mid control.
#mid - Allows control over the mid level of the inputed signal.
#low - Control over the signals low frequencies.
#aux 1 - Control over how much the signal is affected by whatever effects are being utilised through aux 1.
#aux 2 - Control over how much the signal from the channel is affected by whatever effects are inputed through aux 2.
#pre - Pre stands for pre-fader. This control is related to aux 1 and 2, this allows you to decide whether the inputed signal goes through aux 1 or 2 before going through the channels level fader. If pre is urned on this means that the signal will go through the level fader first.
#pan - Individual panning for each channel.
#level fader - Control over the volume of the inputed audio signal.
#mute - Allows you to mute each channel individually.
#solo - Exact opposite of mute, mutes all other channels apart from the channel where solo is selected. Solo allows for each channel to be played back individually without hearing any of the other channels.
#input - Each channel's input is located at the top of the channel. One device or a whole chain of devices can be plugged into each channel's input.
Master Controls
The master controls are similar to the master controls of any other device, they control the device master output and allow for adjustments to be made to the output signal rather than each channel individually. The master controls also include the master controls and inputs for both aux 1 and 2.
NOTE: The below image only shows the controls for aux 1 since the controls for aux 1 and 2 are exactly the same.
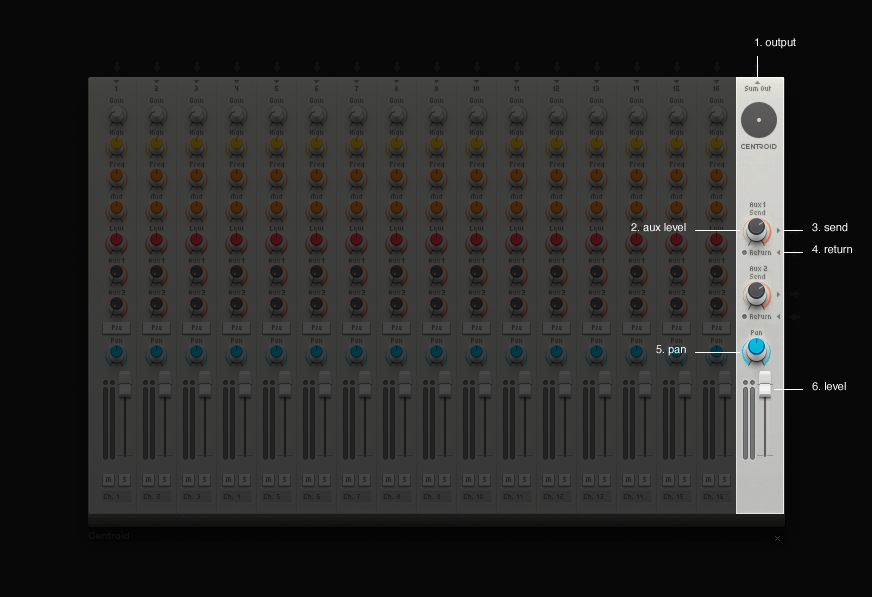
#output - This is the Centroid's master output, this is where all of the channels are merged together into one cable.
#aux level - Allows adjustment over how much of the effect chain inputed into aux 1 will be allowed into the device.
#send - This is aux 1's input, this is where an effect chain's input can be inputed to aux 1.
#return - This is where an effect chains output can be inputed to aux 1.
#pan - Master panning control, this will affect the signal from all channels.
#level - Centroids master volume control, this will affect the volume of every channel.
Aux
The Centroid includes 2 auxiliary modules. These each allow for an effect or a chain of effects to be inputed into the device, an effect pedals input can be plugged into send and the effect pedal output can be plugged into the return input. This makes it possible to add the effect to all, some or just one of the Centroid's channels. It is then possible to adjust how much the effect or chain of effects will affect each channel individually. As well as the individual controls for aux 1 and 2 found in each channel aux 1 and 2 also have master level controls which are labelled on the above image.
Below: The below image shows a Reverb effect pedal utilising send/return with aux 1.

Comments (50)
how do you extend it though? and shorten it?
That's in the beta. You just right click the centroid and there should be an option
how do i get to use this
Find its icon in the devices panel on the right, drag it to your desktop and connect other devices to it.
The app doesn't show it on the device panel side, and I'm only limited to using one sample because of the mixer that Audiotool gave me to start with. Is there any other way I can access this mixer?
It's listed under "Tools", second row, first item.
Alternative devices: Minimixer, Kobolt, Merger
We need midi support on the mixer pleeeeeease
how do i get rid of this
Same as with every other device: there's an "X" to the bottom right. Clicking it removes the device.
Alternatively: select the device and press the DEL-key on your keyboard.
How to make more channel strips?
Right click an empty area inside a channel strip and choose Insert Channel Strip > Before (new channel strip on the left) or After (on the right).
Thank you for a help :)
sois this a mixer for after i record?
Yes.
is there any way i can rotate this to make it uselessly upside down or do I have to put it below all my stuff so the wires don't mess me up all the time
At least the wires don't obscure the mixer by going over it.
I am a beginner here Hi! Any idea or tutorial or help for me to use the audio of this device to be manipulated or used by Audiotool? Or in other words, use my device as an music for the mixer to be used?
The help is right above your comment.
Hi! I don't know how to use audiotool at all. can someone please tell me how to make music and stuff?
Here's a very simple introduction to AT Studio's devices: https://www.audiotool.com/product Scroll down to the bottom of the page and you'll find links to a FAQ and some Tutorials under the Help header. Hope it helps.
how do i record audio? do i have to plug something into my Chromebook?
Yes, you'll need a microphone connected to your computer or audio interface. Alternatively you can use the computer's built in microphone, if it has one. For recording, check this guide: https://www.audiotool.com/board/manual/audio_live_recording-nuy65x
is there a faster way to insert channel strips without going one by one?
You can only add channel strips one by one. But if you use the keyboard shortcut (Shift+Right arrow) then you can do so pretty fast. Use Shift+Left arrow to remove channel strips.
how do i make it make sound because its not letting me hear anything
Do you see the level meters moving in the channel strips? Make sure that whatever you have connected to it makes sound. Make sure that the channels are not muted. Also, that you have connected the Centroid's output to the MasterOutput device and that the volume is not turned down.
how do i add a 2nd one to one of my mixes
how do I add another centroid
Just drag it to an empty area of the desktop from the device panel on the right side.
See above.
yaaaa, when i add another centroid and plug something in it won't give that device any sound.
You should probably connect the output of the new Centroid itself to something that goes to the Master Output.
when i add another centroid all of the sound goes away
How do i turn it back on
Connect something to it.
It's always on.
if it is playing but there is no sound you have to make sure that it is plugged into the stereo output. Otherwise it wont play at all. maybe this was your problem?
How do I record the drum machine into a new channel strip. So can cut it up and lay out the full drum parts?!
If you want to record audio from an external instrument (hardware drum machine), it's not really related to the Centroid. Here are the instructions: https://www.audiotool.com/board/manual/audio_live_recording-nuy65x
Is there anything special i should do with the lp/hp Q?
The Centroid doesn't have filters or a Q parameter.
why wont it let me connect anything to it?
I don't fully understand what the aux outputs are for
Think about them as two alternative mixes of your signals, in addition to the main one at the "Sum Out" output. You set the loudness of signals on each with the Aux1 and Aux2 knobs on the corresponding channel strip, then the total loudness with the Aux 1 and 2 Send knobs. Their purpose is to apply effects to many signals simultaneously. The processed mixes return to your primary mix through the Return connectors.
How do I get things to Auto-Connect to the centroid? It did that at one point for me but doesn't anymore...
Open Window > Preferences on the top bar menu or press Shift+P. Click Desktop on the left. Enable Auto Wiring and click Done. Any instrument you drag from the panel will auto-connect.
you've got to click and hold on the output cable from your device that you want to connect the centroid to, and then drag the cable to the input slot in the centroid.
Is there an order between the aux? Does it hit aux1 before it hits aux2? :P
No, both Aux sends are independent of each other. You control the volume of each signal on each Aux with the respective Aux knob in the channel strip, and the volume of the total mix with the Send knobs.
For a better overview of your requests we ask you to post questions about help for this device in our HELP board https://www.audiotool.com/board/support
And if you have found a bug, post it here https://www.audiotool.com/board/bug_reports
Thanks